
How to start training pike flexibility
One of my gymnastics flexibility goals is to perform a standing pike with my torso flat against my legs. I also want to touch my head-to-toe with a straight leg - the head-to-toe stretch.
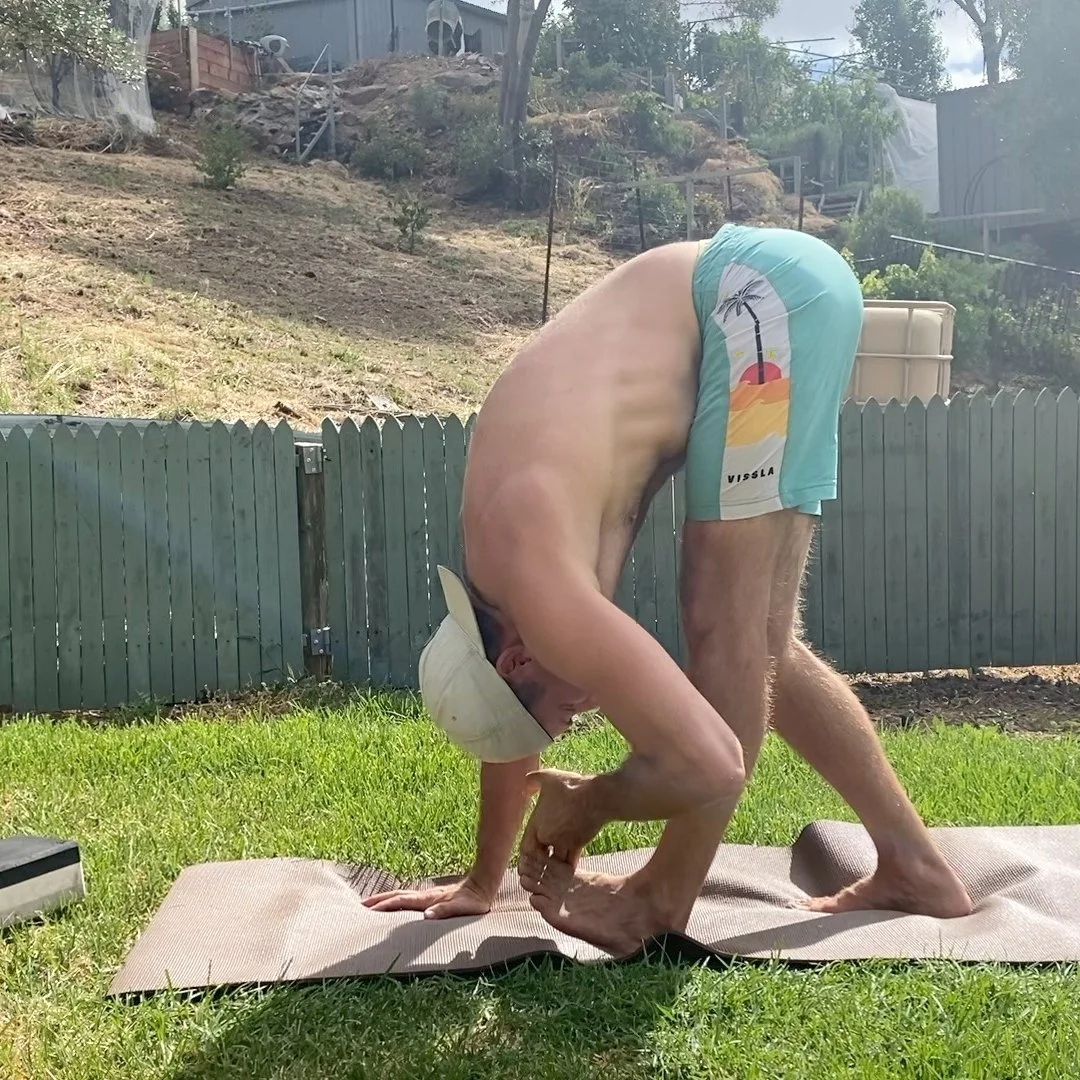
Head-to-toe stretch
Over the last 18 months, I've been working to increase my flexibility.
As an adult, it's easy to fall into the trap of thinking that we'll never be flexible.
"Either you're born with it, or you're not."
"I'm too old to start training flexibility."
I get it.
After years of training and competing in endurance sports and then doing CrossFit, I never thought of myself as someone who could be flexible.
Two essential things I've learnt are:
Increasing flexibility is like building strength; it takes time and consistency.
It's never too late to increase flexibility.
If you’re an adult gymnastic skill seeker you might like to read "How to increase flexibility as an adult."
With that said, let's get back to the point of this post and talk about how to start training pike flexibility.
The obvious part of pike flexibility is increasing posterior chain length. We need to stretch the calves, hamstrings, glutes, quadratus lumborum, spinal erectors, trapezium and more.
By stretching the posterior chain muscles, we create the length needed to fold forward and close the angle between the torso and the thighs.
So, where do you start?
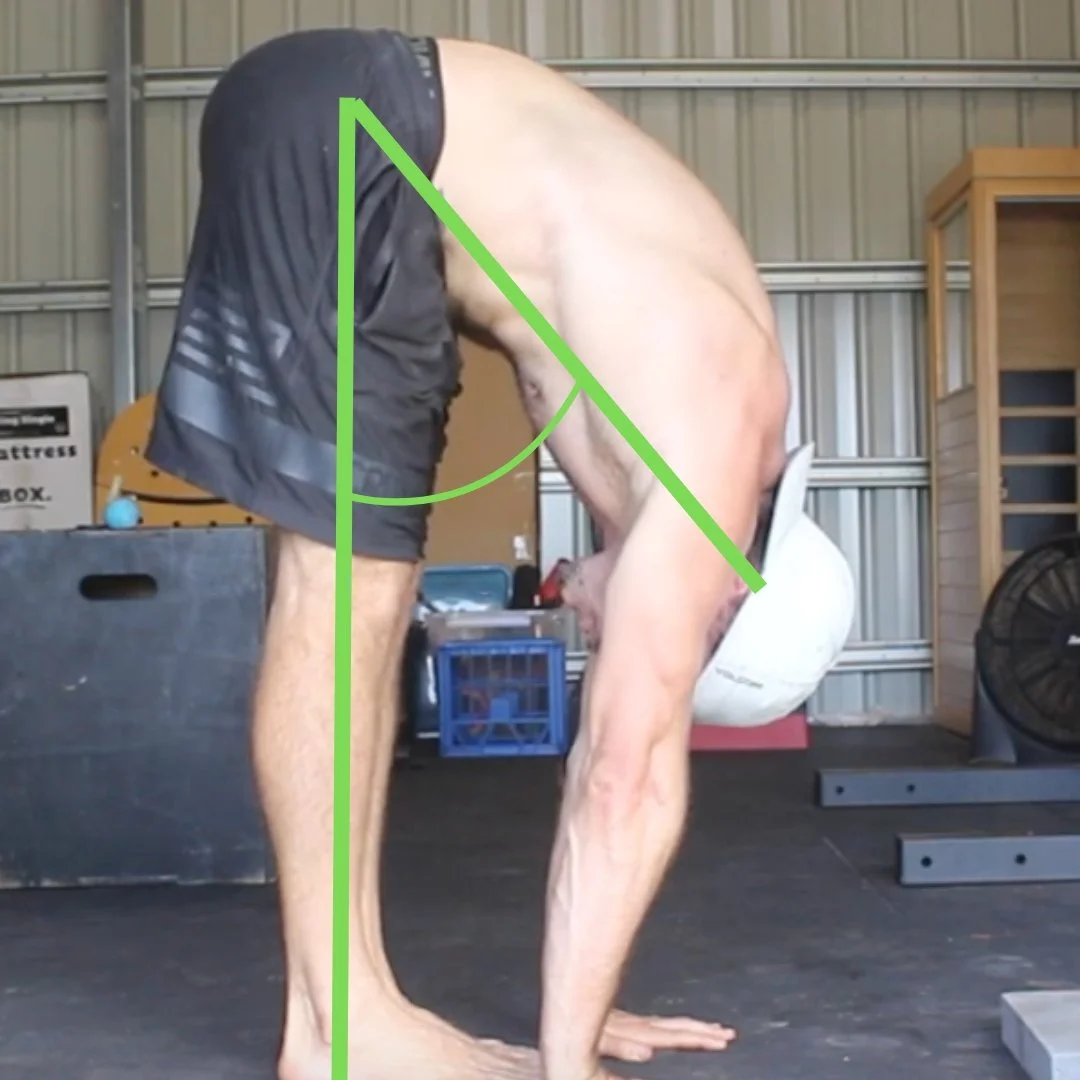
For most gymnastics skill seekers, I suggest starting with Split Stance Romanian Deadlifts. The first milestone is to accomplish a Split Stance RDL to a lever where the back is flat, and the torso is parallel to the floor.
The split stance RDL allows us to focus predominantly on hamstring flexibility.
The primary goal of the Split Stance RDL is to maintain a flat back.
The secondary goal is to increase the range of motion so that the torso is parallel to the floor.
We must not sacrifice the primary goal to achieve the secondary goal.
I like unilateral RDL's as they allow us to compare sides and test structural balance. If one side is tighter than the other, we keep working on unilateral exercises to fix the imbalance before progressing to bilateral exercises.
From here, the next progression is the Split Stance Good Morning.
It's nearly identical to the RLD, except the weight is placed in a mechanically more challenging position. It's now further away from our centre of mass, which helps to increase the strength demands. This allows us to build strength in the new range of motion we've created by stretching the hamstrings.
Both of these exercises take advantage of gravity.
In a standing position, we're using gravity to assist the stretch. I prefer to use standing stretched for beginners and save seated pike stretched for later in the pike flexibility journey.
These split stance exercises are very hamstring focused, so they don't effectively stretch all the posterior chain muscles.
From here, I like to introduce Jefferson Curl.
To do this, I use the wall for assistance. The wall provided excellent feedback for spinal segmentation and pelvic tilting.
We start by practicing the top half of the Jefferson Curl and later move into the full Jefferson Curl.
The Jefferson Curl targets the entire posterior chain and is one of my favourite flexibility drills. I believe most people can benefit from adding Jefferson Curls into their training program unless they have an existing back injury. If you’re experiancing back pain in movements like the Jefferson Curl I suggest you work with a coach one-to-one to rehab your back so you can start doing Jefferson Curls pain free.
A common problem in pike flexibility training is more awareness of pelvic tilt. Many people have never heard of a Posterior Pelvic Tile (PPT) or an Anterior Pelvic Tilt (APT).
I'd only heard of it when I started Gymnastics Strength Training (GST).
But, if you're entering the world of GST, you'll need to understand PPT and APT.
The pelvis can tilt both forward and back.
Think of the pelvis as a bowl of water.

To tip the water out the front of the bowl, you need to tilt the bowl forward - this is an Anterior Pelvic Tilt (APT).
To tip the water out the back of the bowl, you need to tilt the bowl backwards - this is a Posterior Pelvic Tilt (PPT).
It seems simple enough, but many people need more APT and PPT range of motion and control.
As the saying goes, "if you don't use it, you lose it."
If you are unaware of what PPT and APT are, how can you use them?
In the pike stretch, you need to be able to move the pelvis into APT. To tilt the pelvis forward (APT), the front of the pelvis must move down, and the back must move up.
Core Compression Strength & Forward Fold Flexibility Program
DOWNLOAD A FREE SKILL-BASED PROGRAM TO HELP YOU BUILD CORE COMPRESSION STRENGTH AND FORWARD FOLD FLEXIBILITY.
For the front of the pelvis to move down, the abdominals need to lengthen, and the hip flexors need to shorten.
For the back of the pelvis to lift, the hamstring needs to lengthen, and the lower back muscle needs to shorten.
This is why we start pike training with specific hamstring flexibility, Slit Stance RDLS and Good Mornings.
Thanks to our modern lifestyle of always sitting, many gymnastics skill seekers have weak abdominals and hip flexors, tight hamstrings and lower backs. Hence their ability to tilt their pelvis is minimal.
The Jefferson Curl is one tool that helps increase pelvic tilt, but it's not the only one.
Some of the best exercises I've found for improving APT are the bent-knee to straight-knee pike stretch variations. Examples are the Squat to Pike Stretch and the Standing Pike Block Crush.
The primary goal of these exercises is to close the angle between the torso and the thighs. When the knees are bent, we remove tension from the adductors and hamstrings, which allows the pelvis to tilt forward so we can rest our belly on our thighs.
As we straighten the legs, we want to fight to keep the belly on the thighs and maintain the APT while we stretch the adductors and hamstrings. To do this, we want to focus on actively contracting the hip flexors and using them to pull the torso down towards the thighs.
It's a double win.
We're strengthening the hip flexors while stretching the hip adductors and hamstrings.
We also have gravity on our side, so they’re a great exercise for beginners.
These are just a few flexibility exercises I like to use with clients starting their pike flexibility journey.
After achieving the Split Stance RDL's milestone and then training the Split Stance Good Mornings, you'll be ready to implement the Jefferson Curls, Standing Pike Block Crush and the Squat to Pike.
I guarantee you'll see improvements in your pike flexibility if you can consistently train and progress these movements over a 12-24week period.
After that, you'll be ready for some more advanced pike stretches.
But I'm not done yet.
Now that we've discussed the obvious part of pike flexibility, what about the not-so-obvious part?
You might have already picked up on the fact that pike flexibility has two sides:
Posterior chain flexibility - which we talked about in this post
Anterior chain strength - which we mentioned in this post but could have covered in more detail.
It's the anterior chain strength that helps to pull us into the pike stretch. We use the hip flexors and lower abdominals to pull us down into the end ranges of our posterior chain flexibility. We've seen this in the Squat to Pike and the Block Crush, but there are a few more exercises I like to use to target anterior chain strength directly.
In GST, anterior chain strength is referred to as Core Compression Strength. In the next post, I will write about how to start training core compression strength.